Move to iOS
Screenshots

Move to iOS is the official bridge created by Apple to help users switch platforms without losing their precious data. Switching from one ecosystem to another often feels like a daunting task. You might worry about losing your contacts, photos, or message history. However, this application simplifies the entire transition. It creates a private Wi-Fi network to transfer your content securely.
The process is wireless and straightforward. You do not need cables or a computer to move your files. Instead, the app handles the heavy lifting for you. It identifies your content and organizes it on your new iPhone. This ensures a seamless start to your journey with Apple.
Why you should use Move to iOS for your transition
Switching to a new phone should be exciting, not stressful. Many users hesitate to change devices because they fear data loss. Move to iOS eliminates this concern by automating the migration. It moves your essential information quickly and accurately. You can transfer your contacts, mail accounts, and even your web bookmarks.
The app uses a direct connection between the two devices. This method is much faster than uploading files to the cloud and downloading them again. Furthermore, it preserves the quality of your photos and videos. You won’t find blurry images or missing metadata after the move. It is the most reliable way to ensure your digital life follows you to your new device.
Preparing your devices for Move to iOS
Before you begin, you must check a few requirements. First, ensure your old device has Wi-Fi turned on. You should also plug both your old phone and your new iPhone into power. Large data transfers can drain batteries quickly. Keeping them plugged in prevents the process from stopping halfway through.
Check the size of the content you are moving. Make sure your new iPhone has enough storage space for everything. This includes content on your external SD card. If the data exceeds the available space, the transfer will fail. Additionally, update your Chrome browser on the old device if you wish to transfer your bookmarks. Preparation is the key to a smooth experience.
Step-by-step guide to using Move to iOS
Start the setup process on your new iPhone. Look for the “Apps & Data” screen during the initial configuration. Select the option to move data from another device. Now, open the Move to iOS app on your old phone. Tap “Continue” and agree to the terms and conditions.
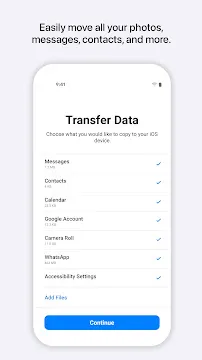
A ten-digit or six-digit code will appear on your iPhone. Enter this code on your old device. The two phones will then establish a private connection. You will see a list of content types you can transfer. Select the items you want, such as:
- Camera roll photos and videos
- Message history
- Contact lists
- Google accounts
- Calendar events
- Display and accessibility settings
Once you choose, tap “Next” and wait for the progress bar to finish. Leave both devices alone until the transfer completes entirely.
What data can Move to iOS transfer?
This tool is comprehensive in its approach to data migration. It handles the most important aspects of your mobile identity. Beyond the basics like contacts and photos, it also moves your message history. This means your conversations remain intact. Your mail accounts are set up automatically, saving you the hassle of entering passwords manually.
It even helps with your applications. If the apps you used are free and available on the App Store, the iPhone will suggest downloading them. While it cannot transfer the actual app files due to system differences, it provides a handy list. This feature helps you rebuild your app library in minutes. Your custom folders and organized settings also transition over to provide a familiar feel.
Troubleshooting Move to iOS connection issues
Sometimes technology hits a snag. If you face issues, ensure you stay on the app screen. Do not take phone calls or open other apps on your old device during the move. Background activity can interrupt the transfer process. You should also turn off mobile data on the old phone to keep the Wi-Fi connection stable.
If the connection drops, try restarting both devices. Some users find success by “forgetting” known Wi-Fi networks on the old device. This prevents the phone from trying to switch back to your home internet. Also, disable any “smart network” features that automatically switch from Wi-Fi to cellular data. These small adjustments usually fix most pairing problems.
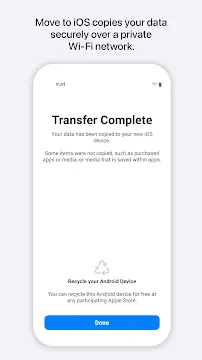
Optimizing your new iPhone after Move to iOS
Once the transfer finishes, your iPhone will process the new data. This might take a few minutes. Follow the remaining on-screen instructions to finish setting up your Apple ID. Check your photo library and contacts to ensure everything arrived safely. You might need to log back into certain accounts for security reasons.
Take a moment to explore the App Store. It will likely have several updates waiting for the apps that were just added. You can also customize your home screen widgets and focus modes. Moving to a new system is a great time to declutter. Since your data is now organized, you can start fresh with a clean, efficient setup.
Conclusion
The transition to a new ecosystem is a significant step. Move to iOS makes this change accessible for everyone. It removes the technical barriers that once made switching difficult. By following a few simple steps, you can carry your memories and contacts into a new experience. The app provides a secure, wireless, and efficient way to migrate. It ensures that your new iPhone feels like home from the very first minute. Embrace the change with confidence knowing your data is safe.